Friday, February 26, 2010

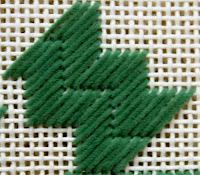
Stitch of the Week: Serendipity


I love the name of this stitch and fortunately it is also a beautiful stitch so that's good (I would hate if it was an ugly stitch -- that would just be a waste of a good name). Anyhow, Serendipity is a small stitch that fits well into small areas and is relatively simple to compensate. The stitch is especially effective in two different colors and/or types of threads.

The stitch is a two-step process. The first step consists of a series of mosaic stitches but instead of having the Mosaic stitches slant up and to the right these mosaic stitches slant up and to the left. A single canvas thread is skipped in-between these "reverse" mosaic stitches.

Once all of the reverse mosaic stitches have been executed, go back and fill in the spaces in between with a series of three stitches (the first stitch is over two intersections, the second is over one canvas intersection and the third is over two canvas intersections). All these fill-in stitches slant up and to the right. See the diagrams provided here.

The Serendipity stitch -- when done in two different colors -- provides an energetic background but the stitch is also useful for depicting clothing, tile floors/walls, paths and packages.

Thursday, February 25, 2010

Focus On: Very Velvet


With this article I am hoping to start a new feature on the blog. It will be sort of a thread-of-the-week article but since we've used the "of-the-week" phrase way too much I though that I would go with something different. The idea is that we will feature a particular fiber and discuss its positives and how it might be used in your stitching. I thought that I would start out with Very Velvet by Rainbow Gallery.


Very Velvet is a popular thread in our shop. We actually sell the Petite variety of this thread as we find that it works well on both 13 mesh painted canvas (meaning it doesn't quite cover the canvas completely but to my mind it covers well enough) and 18 mesh canvas. You can also use the Very Velvet Petite to basketweave on 13 mesh canvas which is not something that you can do with the regular Very Velvet.


One strand of Very Velvet Petite is equivalent to one strand of #5 Pearl Cotton. The thread is 100% nylon and made in Italy. The line consists of 75 colors and Rittenhouse Needlepoint carries the full line. One doesn't necessarily have to worry about dye lots as the colors remain consistent.


Suggested stitches for use with Very Velvet Petite include the Byzantine (clothing), Cashmere (wallpaper, backgrounds), Criss Cross Hungarian (clothing) and Framed Reverse Scotch (Christmas presents, borders). Obviously one would use Very Velvet Petite whenever a velvet texture is desired most likely on clothing (coats, pants) and upholstery/pillows.


If you have not already worked with Very Velvet Petite I would strongly urge you to give it a try. Consider using it on your next Christmas themed canvas as nothing beats it for Santa's clothing!

Thursday, February 18, 2010

Edie & Ginger Trunk Show


From CBK Needleworks we have in the house for the next two weeks a trunk show featuring designs from Edie & Ginger.

Edie & Ginger owned a needlepoint shop outside Philadelphia for many years and their store is fondly remembered by long-time needlepointers in this area. Edie & Ginger are the inventors of the needlepoint frog and the trunk show, not surprisingly, features most of their frog designs.


Also included in the trunk show are numerous Christmas stocking canvases many with whimsical themes including my personal favorite the caroling chorus of mermaids (pictured here)!


I was surprised by a wonderful series of canvases featuring popular fairy tales and children's story book themes. These designs would make a wonderful grouping of pillows for a children's room.

Wednesday, February 17, 2010

Stitch of the Week: Crow's Foot


The Crow's Foot stitch consists of three individual stitches radiating from a central hole (the base of the crow's foot). Begin by coming forward and going down three horizontal canvas threads and to the right two vertical canvas threads. To begin the second stitch come forward in the hole two canvas threads to the right of where you came forward to begin the first stitch. Do a vertical stitch straight down over three horizontal canvas threads and into the same hole where stitch number one ended. The third stitch begins by coming forward two canvas threads to the right of where the second stitch began. Come forward and go down three horizontal canvas threads and to the left two vertical canvas threads. This completes the first portion of the Crow's Foot stitch (see diagram).


The second portion of the stitch consists of two additional elements: 1.) the insertion of a straight stitch (over three horizontal canvas threads) between stitch units and 2.). inserting a row of back stitches (over four vertical canvas threads) between rows. This row of backstitches will share the bottom hole of the "in-between units" stitches. Again, see diagram.


According Howren and Robertson in their book More Stitches for Effect, the Crow's Foot stitch "produces wonderful sleighs, fields, grass, shrubbery, gardens, roads and mountains" (p. 36). I would add that the stitch -- when done upside down -- would also make fine bird feathers.

The stitch itself can be done in one, two or three different colors while individual rows of stitches can also be done in different colors.

I would, most likely, use a natural fiber with this stitch -- wool, cotton, etc. I think that the use of a metallic thread would command too much attention and take away from the pattern of the stitch.

Tuesday, February 16, 2010

New Fibers!

We've been busy beavers here at Rittenhouse Needlepoint. Last week, we returned one trunk show, received another and added nearly a thousand new items to our inventory! Phew, I'm tired just thinking about it.
The new items include many new offerings from Rainbow Gallery including Panache, Mandarin Floss, Crystal Braid, Silk Lame Braid and Fyre Werks. We've also added some new items from DeDe's Needleworks including the very funky Vavoom and the absolutely gorgeous Lacquered Jewels. I will be writing more about these new fibers in the coming weeks with suggestions for how they might be used in your needlework.
We've also increased our inventory in a number of popular product lines such as Very Velvet, Alpaca 18, Rainbow Cashmere and Fuzzy Stuff. We now offer the full line in all of these threads.
You might wonder how we've managed to get more threads into the shop and the answer is -- two ways: 1.) we've added a new wall and 2.) we've added a new rotating display stand (never mind what I used to say about needlepoint shops being too cluttered with spin racks popping up here there and everywhere!) We want threads, threads and more threads!


Saturday, February 13, 2010

Bustin' Out!


Rittenhouse Needlepoint is expanding. We've taken over additional space from our neighbors and moved our finisher and canvas painters into new quarters. The entrance to the new workrooms is through a newly installed door on the "wool wall". There is a small hallway and two modestly sized rooms with terrific light because of full-length windows that look out onto 18th Street. We expect that there will be a big increase in productivity now that Jim, Bianca and Alicia have there own space.


Bianca is also excited because Rittenhouse Needlepoint has purchased for her a heavy duty, commercial sewing machine (it's a "Juki" -- whatever that means!) Anyhow, we expect she is going to be putting out bags, belts and all manner of finished products in a jiffy. Seriously though, good equipment makes a big difference.


Stop by the shop and we would be happy to give you a tour of the new spaces!

Stitch of the Week: Oblique Slav


The Oblique Slav seems like it would be a breeze to do but sometimes the easiest stitches can turn out to be more of a challenge than originally anticipated. This was the case with the Oblique Slav. Stitchers attending the "Stitch of the Week" class eventually got the hang of this stitch and I even saw one apply it right away to a project that she was working on -- so the message is persevere!

The Oblique Slav is a satin or straight stitch that goes down two horizontal canvas threads and to the left over four vertical canvas threads. The next stitch begins two canvas threads to the right of where you began the first stitch and again you go down two horizontal canvas threads and to the left four vertical canvas threads. The row of stitches begins at the left and proceeds toward the right. When you reach the end of the row and you want to return in the other direction, drop down two horizontal canvas threads beneath where you began the last stitch of the previous row. Come forward in this hole and go up two horizontal canvas threads and to the right four vertical canvas threads.

To summarize: when you are working a row of Oblique Slav stitches from left to right, you will begin your stitches at the top of each stitch (and go down two and to the left four) whereas when you are working a row of stitches from right to left you will begin your stitches at the bottom (and go up two and to the right four). This will provide the maximum amount of thread coverage on the backside of the canvas which will help to compensate for the fact that the Oblique Slav is not a stitch with good backing.


The Oblique Slav is a great stitch for imitating crown molding or decorative trim on clothing. Suzanne Howren and Beth Robertson in their wonderful book, Stitches for Effect, recommend using ribbon-type threads for this stitch such as Neon Rays and Shimmer Blend RibbonFloss. Be sure to use a laying tool when working with ribbon-type threads in order to prevent unsightly twisting. Howren and Robertson also suggest using stranded cotton or silk thread (at Rittenhouse Needlepoint these include Embroidery Floss, Splendor or Mandarin Floss).


A most attractive variation on this stitch is two work it diagonally in stripes with different colored threads. Do the first stitch up two horizontal canvas threads and to the right four vertical canvas threads. Begin the second stitch two horizontal canvas threads below and two vertical canvas threads to the left of where you began stitch number one. This "down 2 and to the left 2, then up two and to the right four" procedure is repeated until you reach the bottom of the available space where you will end your thread. Start the next row at the top with a new color.

When the area is completed, fill in the empty spaces at the edge with tent stitches. In general, it is always a good idea to leave compensation for last -- that way you are less likely to get confused especially when you first start working the stitch. Also, be sure not to pull too tightly as this stitch tends to pull the canvas out of shape.