We Love Philadelphia!
There are so many perks to living in Philadelphia. There's great music, theater, arts, food, sites, and traditions.
Like many cities
Summer is a very popular tourist season. Philadelphia is no different however many of our tourist attractions that are best seen during the summer are historical sites. Independence Hall is one of the most important and frequently visited attractions in Philadelphia. It is in the center of Independence National Historical Park which is located on Chestnut Street between 5th and 6th street here in Philly (it's only 12 blocks from us!). It is a very important spot because it is where both the Declaration of Independence and the United States Constitution were debated and adopted.
* It is listed as a World Heritage site, for which we are very proud!
The image above was designed by our in-house painter, Jim Boyle. It is called
Declaration of Independence. As the title suggests, it is inspired by the Declaration of Independence and Philadelphia's involvement in that historic event. It is stitch painted on 13 mesh canvas, which makes it a perfect canvas for beginners and advanced stitchers alike! Click on the Declaration of Independence link to see the canvas on our website.
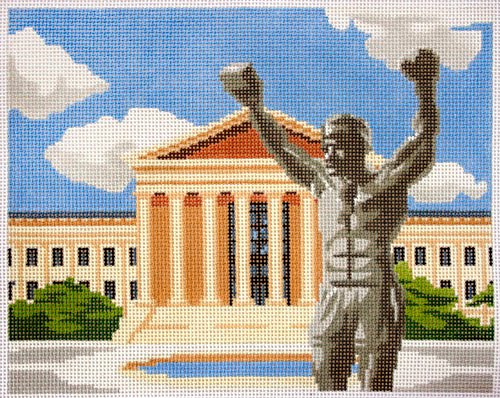
Another famous spot in Philadelphia is the Museum of Fine Arts on the Benjamin Franklin Parkway. It is famous not only because of the museum and it's fabulous collection of well known and beautiful
artwork, but also because it has been featured in movies. You may remember the scene in Rocky where Sylvester Stallone runs up the museum's steps (this is a popular training exercise. It is common to see people running up the steps for exercise and training). There is a statue in front of the museum that immortalizes that scene. Our canvas above called
Rocky Balboa (also by Jim!) was painted from that site. It is also done on 13 mesh canvas, so it is a great canvas for beginners. You can also
get it on 18 mesh if that is what you prefer!
Rittenhouse Square is one of Philadelphia's most popular parks. It is a great place to walk your dog, sit and have lunch, or during the
summer watch live performances. At night the lamps lining the park give it a great ambiance and make it seem almost magical. Jim's painting simply called Rittenhouse Square. Like most of our store originals it comes in both
13 and
18 mesh.
Philadelphia has so many landmark buildings from over the years that we really wanted to create a canvas that featured some of them.
Philadelphia Old and
New is a beautiful canvas. We have had it finished into a pillow for the store, and the colors are so bright and vivid that it really draws your eye right to it!
I hope you enjoyed this little tour and history lesson of Philadelphia. We hope to see you in the shop. We'll be happy to give you some pointers for other great Philadelphia attractions that you can visit!


.jpg)


